Glossy Box #1

Da da da daaa....it has finally arrived!  Australia's first Glossy Box was waiting on my door for me after a very hectic day at work and I was so excited I raced in and tore open the box (ok not in such a manic way as I had to document this grand opening)
So a quick low down, I was originally signed up to Beauty Box.  A few months ago I got an e-mail explaining how Glossy Box has now taken over Beauty Box and that if we wanted to we could continue our subscription with Glossy Box.  Erm HELLO I jumped at the chance!

After seeing countless youtube videos and blogs about Glossy Box I knew I wanted to get my hands on one.  The are also renowned for their great products/presentation, the quality and size of the items.


The image below to the left is how it looks when it turns up on your doorstep.  All protected in a beautiful box and inside is it's trade mark pastel pink box waiting for you to dive in.


Once opened you are greeted with a welcome note from Glossy Box and on the reverse a run down of all the items that have been chosen for you.
Let's just say when I saw what was on the list a grin so large spread across my face.  


So what was in my first Glossy Box:

* Jurlique ~ Age defying Ultra firm & life cream  (RRP  $90/50ml)
Bio Oil ~  (RRP $14.95/60ml - $24.95/12ml - $34.95/200ml)
* Essie ~ Summer Nail Colour  (RRP $ 18.95 - 15ml)
* Bobbie Brown ~ Cleansing Oil  (RRP $60 - 200ml)
* Mirenesse ~ 3D Forever Gloss  (RRP $39.95 - 14g)


For my first box I couldn't have asked for better products.  However I have heard people back in the UK say that some of the boxes since their first have not been as good as the first one, but meh I'm super excited to see what will appear next month and you have to expect some ups and downs.

The first product that caught my eye was the Bobbi Brown Cleansing Oil.  Firstly I love Bobbi Brown and have a few items making an appearance on my Christmas Wish List.  This Oil is a 2-in-1 formula that removes all traces of make-up and cleanses the skin while maintaining your natural moisture levels.  And the plus side, it's suitable for all skin types.  I am so excited to try this out.  So much so I will do tonight and will let you know how it goes.


Next was the Essie nail polish.  I am a huge fan of Essie.  The colours and texture is just fantastic.  It would have to come in joint first with OPI.  The only problem with Essie over here is that it is just so darn expensive.  So a good hunt down on the net for a cheaper buy is the way forward.
The shade is called Meet Me at Sunset.  I instantly painted it onto my nails and I adore the colour.  As I still have a bit of a tan from good old Fiji it looks great.  The shade is a bold red/orange.  A bit like a home brand Tomato Ketchup that can't quite hit the colour on the head.  Regardless of that awful comparison.  I love it!  Big fan.  Huge High Five and whatever other celebratory thing you can think of! 


Up next is Mirenesse's 3D Lip Gloss.  It comes in the colour Hot Kiss.  The colour did shock me at first.  I'm not really use to wearing dark coloured lipsticks/glosses but this would be fantastic for winter. It contains Shea Butter and Vitamin E which feels great on your lips and so moisturising.  It also smells so yummy.  There is no worry of this little beauty running out any time soon as its a good 14g in size.

I have always been a fan of Bio Oil.  I find its great for dry skin.  I use to get really dry legs, esp in the winter so I would rub a layer into my shins and leave over night.  Then in the morning I would awake with shiny new pins ready to face the day!  
I use to have stretch marks when I was younger but they have since faded over the years so am not able to try it out on them.  Though I have heard it works wonders.  We received a hefty 60ml bottle which I cannot wait to start using again.


Last up is Jurlique's Purely Age Defying firm and lift cream.  The cream is said to regenerate the collagen, elastin of the new skin cells and can be applied to your face morning and night.  On twisting off the lid half of the product poured out (Dam my clumsy fat fingers!) I have managed to salvage what I can and hopefully put it to good use today!
Jurlique have such a beautiful range of products, some with a bold price tag but you know you are getting your moneys worth when buying from their store.  They also make awesome Christmas presents with beautiful colourful packaging. 


To say I am a happy girl with my first Glossy Box would be a massive understatement.  I certainly look forward to next months.

Happy 1st December lovelies!

Lipstick love & shoes

I said in a previous post how A) I was going to stop spending and B) that I had another MAC lipstick that I was waiting to arrive.  So the lipstick turned up and I haven't stopped spending!

I am loving MACs Glitter & Ice collection that is out for Christmas and will defiantly be making some more purchases over the next few days/weeks.  I also have my eye on some pieces that will be great for Christmas pressies, just have to be strict and not keep them for myself!

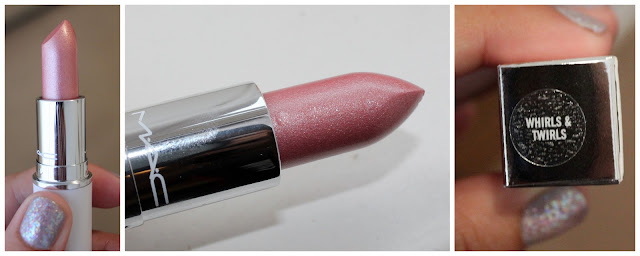
As it's summer here and reasonably hot I don't really fancy too bold of a lipstick during the day.  While browsing I came across Whirls & Twirls.  It's a gorgeous rose pink with some shimmery sparkle.  


When applied it's not so pigmented but leaves a beautiful shimmer over your lips.  A perfect look for work during the day.  I have a feeling I will be getting a lot of usage of this over the summer.


This next one belongs to MaxFactor.  I have one or two pieces from there but I always think it's so over priced and I am never really wowed by the bits I purchased in the past.  That was until today.

There were four different shade sections to choose from and this one jumped out at me.  I was a bit worried about the shade to start.  I have never done a dark lipstick before but I though I would give it a go as the colour was superb.
The colour is Mulberry 685 and for once the colour swatch cap at the end of the lipstick is pretty much spot on with what is inside.


This is defiantly a shade that I would rock in the evenings and during the day once autumn arrives next year.  I was surprised at how it wasn't as dark on my lips once applied.  I did only do two light coats but you could layer up for a darker look.  It is such a beautiful shade and am very tempted to try others from this range.


Last but not least were these sandals that I have been eyeing up for a while.  I have seen them in every shoe shop I've gone into but I either didn't have the money or couldn't justify spending the amount they were.
I was having a snoop around Kmart on the hunt for some bargains and came across these in my size and only for $16.
I grabbed them from the shelf, tried them on then whisked them off to the cash register.  I was so happy with myself for finding these.  I know that these won't last me for years but if they can get me through this summer and autumn then I will be a very happy bunny.


This is what happens while I'm killing time waiting to meet someone.  I shop!

Baby Crab Cakes

We are having friends over for dinner later this week and thought we should do a trail run of our starter as we've never made it before.  Seeing as the sea food is so dam amazing out here in Australia we couldn't resist but to give these little beauties a go.

So here is what you will need:


200g fresh crab meat
2x green shallots, ends trimmed & finely chopped
1x celery stick, finely chopped
2x egg whites
1tbs fresh chopped dill
2 tsp Worcestershire sauce
70g breadcrumbs
1 tbs vegetable oil
1x small ripe avocado, halved, stone removed, peeled & finely chopped
1x fresh red chilli, deseeded & finely chopped
1 tbs finely chopped chives
2 tsp fresh lime juice


Prep time:  15 mins

Cooking time: 20 mins


Now this may seem like a lot of ingredients and don't be put off by it.  It is worth it.  (we did cheat a little as it was a trial run, we didn't use fresh dill or chives, but shhh we will keep that between you & I)


Mix together the shallots, egg whites, crab, celery, dill, Worcestershire sauce (which is where I am from back home) and bread crumbs in a medium size bowl and season with salt and pepper.


Heat a large non-stick frying pan on a medium heat.  Spoon six 1 tablespoonful portions of crab mixture and place in the pan.  Use a palette knife to gently flatten the mixture.

While these are slowly cooking, take your diced avocado, chilli, chives and lime juice and mix in a small serving bowl.  You may need to add a little salt and pepper to season, so try it first before adding!

It doesn't look that attractive in the bowl, but it tastes divine.

Once the topping is done, check your crab cakes.  They should be turning a nice golden brown.  Transfer them to a plate lined with a paper towel to soak up the oil.  Repeat in three more batches with the remaining mixture.  We are cooking for six people this week so we will be doing two per person.


Once golden brown and slightly crisp, place them on a serving dish (or in our case our dinner plates!) and add the avocado topping to complete the cakes.


Ta Daaa...

Now I know it looks like a hell of a lot of green everywhere but for the actual dinner party we will perfect that and tart up the salad etc.  For the mains we are doing a chilli baby snapper.  YUM!
The crab cakes taste amazing if I do say so myself.  They are so easy to do and actually don't take that long.  A perfect little starter or if you want a small dinner these bad boys will fill you up.


Sculptures by the Sea 2011

Every year the costal walk from Bondi to Tamarama hosts a Sculptures by the Sea display.  This is where artists from all over the world design bizzare, out of this world sculptures for the general public to observe.  If you are also a keen art enthusiast and are not worried about shedding big bucks then you can buy one of these amazing pieces for your home.
The sculptures walk is open for about three weeks and the boyfriend and I only just caught it as it was closing.
Take a look, some of them are phenomenal and if you are ever in Bondi next year for November go check it out.


Make-up Storage

After a good year or so of make-up piling up on my side table I decided to find a cheap and easy way to store a majority of the products I don't use on a day to day basis and put them away.
Searching the internet for decent containers was not going well, the cost being the main factor.  Until however I went to Ikea (they do have everything there) and as I want walking through the last section making my way to pay I came across a six draw cabinet/container thing!
The wood it's made from isn't the best so I went and bought some paint and set to it, attempting to make it look a little more appealing than in the flesh than it actually was.

Was wanting to have a very pale aqua blue/green, but this will do for now

So once the paint dried I was then able to sort out all of my products into different draws.  e.g. foundations/concealer in one draw & mascara & eye liners in another.

Here is what it looked like in the end.  The products on top are things that I would use nearly every day so they are easy to grab in the morning.


Also while doing this I did a massive cull of all products that I don't use any more of had seen better days.  Quite refreshing really.

Lipsticks & glosses / eyeshadows / eye liners & mascaras

Foundations & Concealers 

Samples / testers 

Odd bits

I did take these pictures a couple of months ago now so the since then the draws have and are slowly filling up.  Next was to sort out my brushes and create and area for the make-up I use every day.

(I got the Peacock cups from a shop in Cheltenham when I was back in the UK earlier this year...how cute are they!)


I found these great plastic organisers in Target and thought it would be perfect for the make-up I use every day and other useful bits.  It has a good number of sections for my blushes, cotton wool and holds everything so well.


I know these aren't probably the most stylish of containers to be seen but it's practical and does the job perfectly for me.  The wooden draw storage box cost $35 I think and a bargain in my eyes.  
I may even get some stencils or a pretty pattern to put down the side of the box to jazz it up a bit and make my side table not look so boring!


Related Posts Plugin for WordPress, Blogger...